Need Help in Web Hosting, Domain , Business Owner ,Website Builder, Email and Tools, SSl Certificate?
Photoshop's Color Settings
Before we look at why Photoshop's default color settings are a potential hazard, let's see what the default settings actually are. To access them, go up to the Edit menu in the Menu Bar along the top of the screen and choose Color Settings, or press Shift+Ctrl+K (Win) / Shift+Command+K (Mac) for the keyboard shortcut:
Go to Edit > Color Settings.
This brings up the Color Settings dialog box. If you've never seen
this dialog box before and know nothing about color modes, color spaces
or color management, you may be feeling a sudden urge to take a nap.
Don't worry, many very thick books and scientific papers have been
written on the topics that the Color Settings dialog box deals with, but
this is not going to be one of them. We're keeping it simple here
because there's really only a few things you need to know to set the
color settings up correctly. In fact, there's one setting in particular
that can make a world of difference when it comes to the colors you're
able to reproduce in your images, which we'll look at in a moment:
Photoshop's Color Settings dialog box.
The All-Important RGB Working Space
By default, all of the Color Settings options are set to what Adobe calls the North America General Purpose 2 settings, a group of presets that, as the name implies, Adobe believes will work best for the average user most of the time. If you're in a different part of the world than I am, you may see a different group of presets selected, but it makes no difference because we'll be changing some of them manually:
The North America General Purpose 2 presets are selected by default (in North America, anyway).
Most of the settings that Adobe chooses for us here work fine, but
one in particular does not, at least not for serious photography or
image editing, and that's the very first option in the Working Spaces
section of the dialog box - RGB:
The RGB working space option.
When we view and edit our images in Photoshop, we usually work in the RGB color mode,
which means that every color we see in the image on screen is made
from some combination of red (R), green (G) and blue (B). There are
other color modes we can work in, like CMYK (Cyan, Magenta, Yellow, and
Black), which is used for printing, and Grayscale, used for images that
contain only black, white and shades of gray in between, but the RGB
color mode is what we use the most. In fact, if you're a photographer,
there's a good chance you'll never use anything else.The number of colors we can create using different amounts of red, green and blue is practically limitless, but we can't just use any and all possible colors when editing our photos because not all devices can handle the same amount of color. Most printers, for example, can't reproduce all the colors we'd see on a professional quality computer monitor, and some types of printers can reproduce more colors than others. The type of paper you print on also affects the color. This is just the tip of the iceberg when it comes to color management, but one way we try to avoid running into problems is by limiting the range of colors we can work with in Photoshop, and we do that by choosing a color space. The color space we end up choosing is known as the working space, since it's the color space we're, you know, working with. Each color space gives us a specific range of colors that we can reproduce, with some spaces offering far more colors than others. And herein lies the problem with the default choice.
The sRGB IEC61966-2.1 Color Space
By default, Adobe sets Photoshop's RGB working space to sRGB IEC61966-2.1, which I'll refer to by its common name sRGB from this point on so I don't have to keep typing the whole thing. sRGB was created by HP and Microsoft as a general purpose, "bottom of the barrel" standard color space for inexpensive monitors and printers. Basically, it's a color space for the average consumer who knows and cares little about color accuracy or image quality. It's also the standard color space for images on the internet, since most web users out there own one of those inexpensive, average consumer monitors. If you're a web designer who uses Photoshop exclusively for creating images to display on the web, the sRGB color space will do you fine. If you're a photographer who's passionate about your images, though, you'll want to choose a different color space, and here's why.
Take a look at this graph, which I created using Apple's ColorSync utility. This graph shows the color range available to us when working in the sRGB color space. The outer, curved area represents all the colors the human eye can see. Inside that large shape is a small triangle. The area inside the triangle represents the colors the sRGB color mode limits us to. None of the colors outside of the triangle are available to us when working in sRGB, which means many deep, rich, saturated colors are off limits. Is this really a limitation you want to place on yourself and your images when viewing and editing them? If you're still reading this, the answer is probably no, but that's exactly what you're doing by using Photoshop's default sRGB color space:
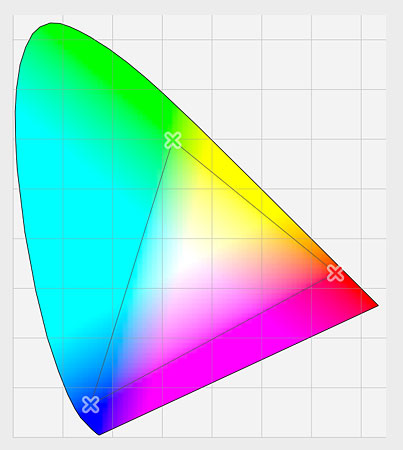
No colors outside the triangle can be reproduced using sRGB.
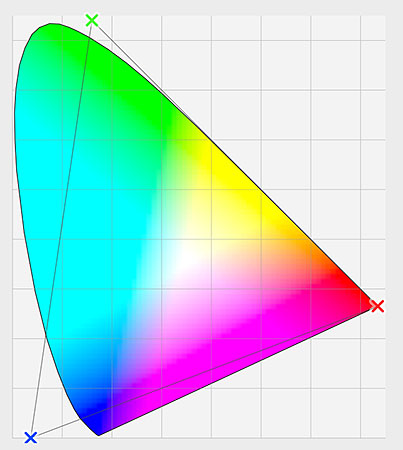
The Better Choice - Adobe RGB (1998)Let's compare sRGB with another popular color space we can choose instead, Adobe RGB (1998), and no points for guessing which company created it or in what year. Here's the same ColorSync graph showing all the colors our eyes can see, but this time, the triangle represents the Adobe RGB (1998) color range:

The much larger color range of Adobe RGB (1998).
Notice how much larger the area inside the triangle is with Adobe
RGB, which means we can view and reproduce far more colors than what the
default sRGB color space gives us, and more colors means better looking
images, along with more editing headroom. Many higher quality inkjet
photo printers are compatible with Adobe RGB, so your prints will also
enjoy deeper, more saturated colors. This is the color space used by
most professional photographers and photo retouchers, and to start
benefitting from all these additional colors right away, all we need to
do is change the RGB working space option from sRGB to Adobe RGB
(1998):
Click on sRGB and choose Adobe RGB (1998) from the drop-down list.
To get the most out of the increased color range, many higher end
digital cameras feature the option to set Adobe RGB (1998) as the
camera's color space, which means your photos will look that much better
from the moment the camera captures and stores the image. Be sure to
check your camera's manual to see if it supports Adobe RGB (1998) and
select it if it does.ProPhoto RGB
Adobe RGB (1998) is a perfectly acceptable, widely supported and highly recommended color space to set as Photoshop's RGB working space, but there's a growing trend (and a whole lot of controversy) among photographers, image editing professionals and color management gurus towards another color space, ProPhoto RGB. The reason is that ProPhoto RGB has by far the largest range of colors we can work with, well exceeding the color range of Adobe RGB. Here's the ColorSync graph once again, this time with the triangle representing the available colors in ProPhoto RGB:
The incredibly large color range of ProPhoto RGB.
ProPhoto RGB's color range is so ridiculously huge that some colors
it supports actually fall outside the range of human vision! Virtually
every color a digital camera or scanner can capture and every color a
printer can print is available to us in ProPhoto RGB. So what's the big
controversy? If ProPhoto RGB lets us work with the widest range of
colors, why not use it all the time?ProPhoto RGB's biggest strength, it's massive color range, is also the problem, or at least, a potential problem if you don't know what you're doing. Working effectively in ProPhoto RGB involves capturing your images in your camera's raw format (if your camera supports raw), tagging the images with the ProPhoto RGB color profile in Camera Raw (ProPhoto RGB is the native color space of Camera Raw), and opening and editing the images entirely in 16-bit mode in Photoshop, since the color range is so large that editing your images in the more standard 8-bit mode will often cause ugly color banding.
If most of what I just said left your head spinning, stick with the Adobe RGB (1998) color space. It's safe, it's what most professionals use and it gives you more than enough colors to create stunning images. If you shoot your photos in the raw format, understand the difference between 8-bit and 16-bit mode, are intrigued by the idea of working with more colors than your monitor can display or your eyes can see, and want to give ProPhoto RGB a try, simply choose it from the RGB working space's drop-down list. A more detailed discussion of the pros and cons of ProPhoto RGB falls outside the scope of this tutorial, but I encourage you to research it further if you're interested:
Select ProPhoto RGB only of you're comfortable with it, otherwise stick with Adobe RGB (1998).
CMYK, Gray and Spot Working Spaces
The other three working spaces in the Color Settings dialog box - CMYK, Gray and Spot - can all safely keep their default settings:
The remaining color spaces are fine with their defaults.
The only exception you'd want to make is if you know in advance that
you're going to have your images printed by a commercial printer. In
that case, to keep the colors in the prints as accurate as possible, ask
your printer if they can provide you with a color profile. If they do
provide you with one, click on the drop-down box for the CMYK working
space and choose Load CMYK from the top of the list,
then navigate to where you saved the printer profile on your computer
and select it. In most other cases, sticking with Photoshop's default
CMYK working space is fine:
Choose Load CMYK if you have a profile for the commercial printer you're going to use.
Color Management Policies
At this point, we've successfully changed Photoshop's RGB working space to Adobe RGB (or ProPhoto RGB), which is great for images we open now and in the future since they're going to benefit from a greatly expanded range of colors. But what about older images that may have been saved with the default sRGB color profile? Or what if someone asks you to work on one of their photos that was saved and tagged with a different color profile than the one we've set as our working space? What happens when we try to open these images?We need to tell Photoshop how to handle these color profile mismatches, and we do that in the Color Management Policies section of the Color Settings dialog box. By default, Photoshop is set to Preserve Embedded Profiles, which will keep the original color profile intact, and that's usually what we want so there's no need to change these options:
Leave the RGB, CMYK and Gray color management options set to Preserve Embedded Profiles.
Profile MismatchesSince we've already told Photoshop that we want to keep the image's embedded profile when it differs from our working space, you may not want to be asked about it every time you open a new image with a conflicting profile. If you just want Photoshop to go ahead and open the image, keeping the original profile intact, leave the Ask When Opening and Ask When Pasting checkboxes for the Profile Mismatches option deselected. Photoshop is capable of opening and working with multiple images at once, all with different color profiles, so it won't cause any problems as far as Photoshop is concerned. However, I'm a big fan of information and prefer to know what's going on. Even if I have no plans to do anything about it, I still like to be kept in the loop. If you're like me, I recommend selecting these two options:
The Ask When Opening and Ask When Pasting options for dealing with profile mismatches.
With these options selected, if you try to open an image saved with a
different color profile than your working space, Photoshop will display
an Embedded Profile Mismatch warning box, which
informs you of the mismatch and gives you choices on what to do about
it. You can keep the embedded profile, convert the image to your working
space, or discard the profile completely (which defeats the whole point
of color management and isn't recommended). The option to use the
embedded profile will be selected by default, so unless you have a need
to convert the profile to your working space, just click OK to accept
it:
The Embedded Profile Mismatch warning lets you
know about the mismatch and gives you a chance to change your mind about
how to handle it.
Missing ProfilesFrom time you time, you may come across an image that doesn't have a color profile associated with it, especially if you received the image from someone else who knows little to nothing about color profiles or color management. If you want Photoshop to ignore the problem and just open these images, leave the Ask When Opening checkbox for the Missing Profiles option deselected. However, I would again recommend you select this option:
The Missing Profiles option deals with images that were saved without any color profile information.
With the option selected, if you try to open an image that does not
have a color profile associated with it, Photoshop will pop open the
Missing Profile dialog box. As with the Embedded Profile Mismatch dialog
box we looked at a moment ago, what I like most here is that Photoshop
is letting me know the color profile for the image is missing. We then
have three different choices for what to do about it. We can leave the
image as it is and not worry about the profile, we can assign the
working RGB profile to the image, or we can assign a different profile
by choosing one from the drop-down list:
The Missing Profiles dialog box.
Missing profiles can be a bit of a tricky situation, especially if
the image is not your own, in which case your best bet would be to
contact the person who gave you the image and ask for advice on which
color profile to use. Assigning a profile can cause drastic color
changes depending on which profile you choose, and unfortunately, the
Missing Profile dialog box doesn't offer a preview option so you're
essentially working blind. If you don't know which profile to assign, select the Leave as is (don't color manage) option for now and click OK to exit out of the dialog box. Then, once the image is open in Photoshop, go up to the Edit menu and choose Assign Profile:
Go to Edit > Assign Profile.
When the Assign Profile dialog box appears, select the Profile option
at the bottom, then choose different color profiles from the list. Keep
an eye on the image in the document window as you try out the various
profiles and select the one that gives you the best results:
Use the Assign Profile's preview option to choose the best color profile for the image.
Conversion Options
Finally, let's take a quick look at Photoshop's Conversion Options, which control how the colors in the image are handled when we move from one color space to another, or from one device to another (like from your computer to your printer). More specifically, it deals with what happens to colors in the original color space that fall outside the range of color in the new space. For example, you may have colors in your image that look great on your computer screen but can't be reproduced by your printer. These are more commonly referred to as colors that are out of gamut ("gamut" simply means the range of color). The fate of these out of gamut colors is determined by the conversion options. Click on the More Options button on the right of the Color Settings dialog box:
Click on More Options.
This displays some additional options. The one we're interested in is Intent, found in the Conversion Options section. There's two main choices we can select - Relative Colorimetric and Perceptual. Each one handles the color conversion a bit differently. By default, Relative Colorimetric is selected:
Relative Colorimetric is selected by default.
The main difference between the two is that Relative Colorimetric is
concerned with accurate color reproduction, while Perceptual cares more
about the relationships between colors. Both are capable of giving you
great looking prints, but Relative Colorimetric can sometimes produce
harsh transitions between colors as it tries to keep them as close to
the originals as possible. Perceptual, on the other hand, can produce
smoother, more natural looking color transitions, but often at the
expense of color accuracy.As with most things in life, we can't have everything so we need to decide what matters most to us. In this case, the choice is between accurate colors or smoother color transitions. If you do mostly graphics work where color accuracy is very important, stick with Relative Colorimetric. For photographic work, I tend to choose Perceptual because I find it makes images look more natural, even though I know that some of the colors in the print will have shifted from their original values. There's no absolute right or wrong choice here, so I'd suggest printing a few images to compare them and choosing the one you like best:

Perceptual can be a better choice for printing photos (if you're not concerned with color accuracy).
And there we have it! With just a few simple changes to Photoshop's
color settings, we've replaced our drab, "general purpose" default RGB
working space with one that opens our images to a greatly expanded range
of color, we've told Photoshop how we want it to handle images tagged
with different color profiles than our working space, we've looked at
how to avoid assigning the wrong color profile when opening an image
that doesn't have one, and last but certainly not least, we learned how
to choose between accurate color reproduction and more natural looking
colors in our printed images.
0 Response to "Photoshop Essential Color Settings"
Post a Comment